All articles in this series
In the previous article, we’ve seen how to wire up a JavaFX application with Spring Boot properly. However, the user interface was super simple and was implemented with pure Java code. In an ideal world, we want to separate the user interface from the application logic. With FXML, we define our view as XML, assign a controller Java class for each view, and implement the business model and application on the Java side. Hence we’re using a MVC approach. Another reason is, it is much easier to build a view with the SceneBuilder.
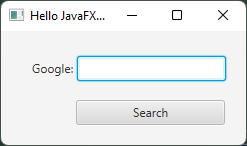
Let’s make our application a little bit more functional. We will be building a simple google search window.

When user enters a text and clicks the button, the program will open your default browser search for text on google.com.
First, we need to add the Maven dependency for FXML:
<dependency>
    <groupId>org.openjfx</groupId>
    <artifactId>javafx-fxml</artifactId>
    <version>${javafx.version}</version>
</dependency>
Let’s define our simple user interface with FXML:
<?xml version="1.0" encoding="UTF-8"?>

<?import javafx.geometry.*?>
<?import javafx.scene.control.*?>
<?import javafx.scene.layout.*?>

<AnchorPane xmlns:fx="http://javafx.com/fxml/1" xmlns="http://javafx.com/javafx/11.0.2"
            fx:controller="com.hrzafer.javafxspringbootstarter.controller.MainController">
    <children>
        <Label layoutX="31.0" layoutY="29.0" text="Google:"/>
        <TextField fx:id="keywordTextField" layoutX="76.0" layoutY="25.0"/>
        <Button fx:id="searchButton" layoutX="75.0" layoutY="69.0" prefHeight="25.0" prefWidth="149.0" text="Search"/>
    </children>
    <padding>
        <Insets bottom="10.0" left="10.0" right="10.0" top="10.0"/>
    </padding>
</AnchorPane>
We can name this main.fxml and save it under src/main/resources/com/hrzafer/javafxspringbootstarter/controller/main.fxml. Let’s also implement a simple controller, MainController for this view. This class will be under com.hrzafer.javafxspringbootstarter.controller package. This way, the view and the controller will be under the same directory in the classpath.
@Component
public class MainController {

    private final HostServices hostServices;

    @FXML
    public TextField keywordTextField;

    @FXML
    public Button searchButton;

    public MainController(HostServices hostServices) {
        this.hostServices = hostServices;
    }

    @FXML
    public void initialize() {
        this.searchButton.setOnAction(actionEvent -> this.hostServices.showDocument("https://www.google.ca/search?q=" + this.keywordTextField.getText().trim()));
    }
}
Notice MainController requires a HostServices object in its constructor. Spring will be responsible for creating an instance and passing it into the constructor. But we need to tell Spring how to crete such a bean.
Add the following line into the init method of JavaFxApp:
context.registerBean(HostServices.class, this::getHostServices);If you remember from the previous article, StageReadyEventListener was responsible for the UI creation. So weed need to update it as follows:
@Component
public class StageReadyEventListener implements ApplicationListener<StageReadyEvent> {

    private final ApplicationContext applicationContext;
    private final String applicationTitle;
    private final Resource fxml;

    public StageReadyEventListener(ApplicationContext applicationContext,
                                   @Value("${app.title}") String applicationTitle,
                                   @Value("classpath:/com/hrzafer/javafxspringbootstarter/controller/main.fxml") Resource fxml) {
        this.applicationTitle = applicationTitle;
        this.applicationContext = applicationContext;
        this.fxml = fxml;
    }


    @Override
    public void onApplicationEvent(StageReadyEvent event) {
        try {
            Stage stage = event.getStage();
            URL url = fxml.getURL();
            FXMLLoader fxmlLoader = new FXMLLoader(url);
            fxmlLoader.setControllerFactory(applicationContext::getBean);
            Parent root = fxmlLoader.load();
            Scene scene = new Scene(root);
            stage.setScene(scene);
            stage.setTitle(this.applicationTitle);
            stage.show();
        } catch (IOException e) {
            throw new RuntimeException(e);
        }
    }
}
Notice that we added a Resource object as class variable. This is a special Spring object to handle resources. We also told Spring where to read this resource with the @Value(classpath:...) annotation. But the most important line is fxmlLoader.setControllerFactory(applicationContext::getBean). Here we tell the FXMLLoader, let the Spring’s ApplicationContext be responsible for creation of the controller of this view. Without that line, FXMLLoader would try to instantiate the object itself. But it wouldn’t be able to do so, because MainController doesn’t have a constructor that takes no arguments. With the @Component annotation over the MainController, Spring knows that creating an instance is its responsibility. Spring creates an instance regardless of the fxmlLoader.setControllerFactory(applicationContext::getBean) line. Without that line, FXMLLoader tries to create another but fails.
