All articles in this series
- JavaFX with Spring Boot Part-01: Introduction
- JavaFX with Spring Boot Part-02: Basic Integration
- JavaFX with Spring Boot Part-03: Advanced Integration
- JavaFX with Spring Boot Part-04: Using FXML
- JavaFX with Spring Boot Part-05: FxWeaver Integration
In the previous article, we’ve learnt how to let Spring take care of creating controllers for FXML views and everything else on the java side. At this point we already have a full JavaFX and Spring integration. In this article, we’ll lift the integration one level up. In other words, we’ll make use of Spring even more.
Why FxWeaver ?
You may ask we’ve already well integrated JavaFX with Spring Boot. Then what’s the point of introducing another library in the way? First of all, FxWeaver is very easy to configure and use. It doesn’t introduce much complexity really. But it does make Spring Boot as if it was created specifically for JavaFX application development. Click for more details on why it was created.
Setup
First, we need to add the Maven dependency to pom.xml.
<dependency>
    <groupId>net.rgielen</groupId>
    <artifactId>javafx-weaver-spring-boot-starter</artifactId>
    <version>1.3.0</version>
</dependency>
Now add @FxmlView("main.fxml") annotation over the MainController.
@Component
@FxmlView("main.fxml")
public class MainController {
    ...
}
This tells FXWeaver that we have a main.fxml file in the same package but in the resource folder. Now change the StageReadyEventListener as follows:
@Component
public class StageReadyEventListener implements ApplicationListener<StageReadyEvent> {

    private final ApplicationContext applicationContext;
    private final String applicationTitle;

    public StageReadyEventListener(ApplicationContext applicationContext,
                                   @Value("${app.title}") String applicationTitle) {
        this.applicationTitle = applicationTitle;
        this.applicationContext = applicationContext;
    }


    @Override
    public void onApplicationEvent(StageReadyEvent event) {
        Stage stage = event.getStage();
        FxWeaver fxWeaver = applicationContext.getBean(FxWeaver.class);
        Parent root = fxWeaver.loadView(MainController.class);
        Scene scene = new Scene(root);
        stage.setScene(scene);
        stage.setTitle(this.applicationTitle);
        stage.show();
    }
}
Notice the much shorter onApplicationEvent method. Also notice that, we got rid of the Resource xml class variable and @Value("classpath:/com/hrzafer/javafxspringbootstarter/controller/main.fxml") Resource fxml variable from the constructor. Now, finding the fxml resource, loading it, and creating its corresponding controller are no more our responsibility. Isn’t that cool?
Let’s add a menu bar to our little application and create an about window to demonstrate how to create a view from another view easily with FxViewer.
Change the main.fxml as follows:1
<AnchorPane minHeight="150.0" minWidth="300.0" xmlns="http://javafx.com/javafx/11.0.2" xmlns:fx="http://javafx.com/fxml/1" fx:controller="com.hrzafer.javafxspringbootstarter.controller.MainController">
    <children>
      <MenuBar prefHeight="25.0" prefWidth="320.0" AnchorPane.leftAnchor="0.0" AnchorPane.rightAnchor="0.0">
        <menus>
          <Menu mnemonicParsing="false" text="File">
            <items>
              <MenuItem mnemonicParsing="false" text="Close" />
            </items>
          </Menu>
          <Menu mnemonicParsing="false" text="Edit">
            <items>
              <MenuItem mnemonicParsing="false" text="Delete" />
            </items>
          </Menu>
          <Menu mnemonicParsing="false" text="Help">
            <items>
              <MenuItem mnemonicParsing="false" onAction="#aboutMenuItemClicked" text="About" />
            </items>
          </Menu>
        </menus>
      </MenuBar>
        <Label layoutX="14.0" layoutY="51.0" text="Google:" />
        <TextField fx:id="keywordTextField" layoutX="67.0" layoutY="47.0" prefHeight="25.0" prefWidth="233.0" />
        <Button fx:id="searchButton" layoutX="67.0" layoutY="90.0" prefHeight="25.0" prefWidth="233.0" text="Search" />
    </children>
    <padding>
        <Insets bottom="10.0" top="10.0" />
    </padding>
</AnchorPane>
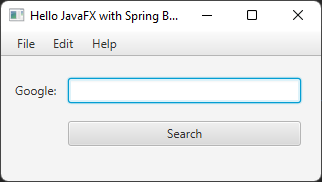
This should look like this:

Notice the onAction="#aboutMenuItemClicked" part of the about menu item above. We should provide a handler with the same name in the MainController. We will fill up the method later.
@FXML
private void aboutMenuItemClicked(){

}
For now the menu items are not responsive. Let’s implement an about view and open it when the Help -> About menu item is clicked.
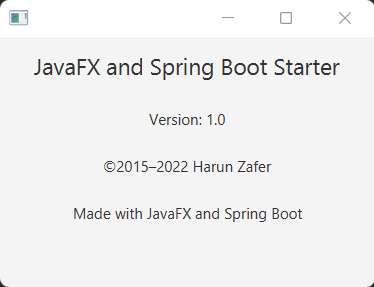
Here is a simple about view in FXML:
<?xml version="1.0" encoding="UTF-8"?>

<?import javafx.geometry.*?>
<?import javafx.scene.control.*?>
<?import javafx.scene.layout.*?>
<?import javafx.scene.text.*?>


<AnchorPane fx:id="pane" prefHeight="200.0" prefWidth="300.0" xmlns="http://javafx.com/javafx/11.0.2" xmlns:fx="http://javafx.com/fxml/1" fx:controller="com.hrzafer.javafxspringbootstarter.controller.AboutController">
   <children>
      <VBox prefHeight="200.0" prefWidth="100.0" spacing="20.0" AnchorPane.bottomAnchor="0.0" AnchorPane.leftAnchor="0.0" AnchorPane.rightAnchor="0.0" AnchorPane.topAnchor="0.0">
         <children>
            <Label alignment="CENTER" prefHeight="17.0" prefWidth="309.0" text="JavaFX and Spring Boot Starter" textAlignment="CENTER">
               <font>
                  <Font size="18.0" />
               </font>
               <VBox.margin>
                  <Insets top="10.0" />
               </VBox.margin>
            </Label>
            <Label alignment="CENTER" prefHeight="17.0" prefWidth="333.0" text="Version: 1.0" />
            <Label alignment="CENTER" prefHeight="17.0" prefWidth="339.0" text="©2015–2022 Harun Zafer" />
            <Label alignment="CENTER" prefHeight="17.0" prefWidth="302.0" text="Made with JavaFX and Spring Boot" />
         </children>
      </VBox>
   </children>
</AnchorPane>
Which looks like this:

Let’s also implement its controller:
@Component
@FxmlView("about.fxml")
public class AboutController {

    private Stage stage;

    @FXML
    private AnchorPane pane;

    @FXML
    public void initialize() {
        this.stage = new Stage();
        stage.setScene(new Scene(pane));
    }

    public void show() {
        stage.show();
    }
}
Above, controller creates its own stage and an scene. Note that AnchorPage is the root element of the about.fxml and its fx:id attribute is pane. It is time to show this view from the MainController.
@Component
@FxmlView("main.fxml")
public class MainController {

    private final HostServices hostServices;
    private final FxWeaver fxWeaver;

    @FXML
    public TextField keywordTextField;

    @FXML
    public Button searchButton;

    public MainController(HostServices hostServices, FxWeaver fxWeaver) {
        this.hostServices = hostServices;
        this.fxWeaver = fxWeaver;
    }

    @FXML
    public void initialize() {
        this.searchButton.setOnAction(actionEvent -> this.hostServices.showDocument("https://www.google.ca/search?q=" + this.keywordTextField.getText().trim()));
    }

    @FXML
    private void aboutMenuItemClicked(){
        fxWeaver.loadController(AboutController.class).show();
    }
}
There are two main changes from the previous version here. First, we add FxWeaver as a class member and getting it from the constructor. Remember that FxWeaver object will be created and passed to the constructor by Spring. Second change is the aboutMenuItemClicked method. See how we are creating an instance of AboutController and calling its show method. One important detail is that Spring creates objects in Singleton scope by default. Which means, even if we call the fxWeaver.loadController(AboutController.class).show() from multiple places for many times, there will be only one AboutController instance. A great way of avoiding memory leaks.
Finally, I'll show you a simple trick to shorten the code above. With the `@RequiredArgsConstructor` annotation of Lombok, we can remove the constructor. This especially nice when there are two or more `final` class variable.
